ROBOTECH: Modelers Resource Center
- blackconvoy_D01
-

- Offline
- Veritech Fighter
-

- Posts: 289
- Thank you received: 0
Replied by blackconvoy_D01 on topic Re:ROBOTECH: Modelers Resource Center
www.flickr.com/photos/26350372@N04/
Please Log in to join the conversation.
- Mark-Warlock
-
 Topic Author
- Offline
- Veritech Fighter
-
- Writer
- Posts: 301
- Thank you received: 0
Replied by Mark-Warlock on topic Re:ROBOTECH: Modelers Resource Center
Ive got a question Mark. My YF-1R has a nearly complete loose right foot. Last night it fell 5' off of its shelf to the ground and the booster pack broke off. I got the pack back on but I have to tighten this foot. The plug for the screw is sealed in so I cant remove it. How to I tighten up the foot, or I should say ankle?
BlackConvoy
This is a great question. I know there are many many collectors out there that share this same issue.. So you're not alone.
Collecting older items is great but there are times when you get them and the arms, legs, cannons, or what have you are just floppin around all over the place... the knees are sooooo loose that the figure just keels right over... or in your case.. the "ankle" is so loose that it won't hold the figures weight...
Well there are solutions available and I will share a couple with you...
Now one of the most basic of solutions is to visit a local hobby shop and purchase some Evergreen styrene in strip or sheet form. This is best used for more hidden joints like say in an SDF-1 arm or the VF-1 shoulder where the figure itself will cover the repair...
First decide how much play is involved and then select the proper thickness of your Evergreen sheet... Next cut a small disk or square, which ever you prefer... then cut a hole in the center the same size as the attaching points. next you'll want to test fit everything... put the disk you've made between the part body and the part and tighten the screw.... next check the tightness of the repair.. .if it is not tight enough then use the next thickest sheet and try again until you achieve the desired tightness. Now that you have the shim you need... take it apart again... apply a small amount of superglue (and I mean small) and glue the disk in place... now reassemble... If you have checked everything right the joint should be nice and tight and the repair will be hidden.
Now this is another method... one that I tend to use more often... but be warned... It is and can be very dangerous if not done properly..
I'll give you an example of my last use of this method..
Recently I found a Matchbox Tomahawk destroid in a box I had from when I was a kid.. I was so excited to find it until check the joints… yep you’ve all seen it… the arms, legs, and “toe” joints were all loosey goosey.
My first step was to go right over to my work desk and grab my trusty tube of superglue.
You’ll want to be very careful… figure out which joint you will want to start with.. next find a hidden part of the joint… in my case I started with the left arm where the cannon attaches to the upper arm.. my starting point was to the inside of the arm. I applied a small (and I mean very very small) drop of super glue at the joint. Then I immediately began working the joint back and forth. Be sure you DO NOT stop once you start cause if you do the superglue will lock that joint in place… Continue working the joint back and forth. As the superglue begins to dry you will notice the joint begin to tighten up. This is because the superglue is acting as a shim taking up the extra space between the two pieces. Once the superglue dries the joint should be noticeably tighter. Now if you need to you can make another pass at it.. just be sure to continue the movement until the glue is dry.
If I’m understanding your issue you are speaking of the “thrust” nozzles or feet.. if that’s the case then you want to apply the glue to the inboard side of the foot. Make sure you apply the glue as close to the pivot of the joint as possible so that the glue is able to get into the actual joint. Be sure to use small amounts of the superglue so as not to create any “frosting” of the plastic or require too long a dry time. Then work the thrust nozzles open and closed until the glue has dried. As you work the nozzles you should feel them tighten up. Be sure to keep working them until the glue has dried sufficiently. If you applied a small amount it shouldn’t take more then 30-45 seconds or so… but be sure that you are certain the glue has dried.
Normally in many joints there will be a small amount of wearing that occurs over time and this tip helps to take up that wear space. Both of these methods work to help tighten up those loose joints but make sure as with every tip you want to test it out on a scrap kit, or toy until you are confident.
Thanks for your question BlackConvoy and I hope you found some helpful information here. If you need further assistance feel free to PM me.
Thank you again and as always.. Happy Modeling.
Find Mark Warlock now on Facebook.
Please Log in to join the conversation.
- blackconvoy_D01
-
- Offline
- Veritech Fighter
-
- Posts: 289
- Thank you received: 0
Replied by blackconvoy_D01 on topic Re:ROBOTECH: Modelers Resource Center
www.flickr.com/photos/26350372@N04/
Please Log in to join the conversation.
- Mark-Warlock
-
Topic Author
- Offline
- Veritech Fighter
-
- Writer
- Posts: 301
- Thank you received: 0
Replied by Mark-Warlock on topic Re:ROBOTECH: Modelers Resource Center
Very cool Matt. Thanks for the info. Ive tried glue in the past and I'll give it a shot first as we dont have hobby stores here that sell the items you listed for the other means of fixing my veritech. Ill post my progress.
Hmmm.... MATT??
OK so I've gotten a few personal emails asking about what kind of modeling tools and supplies one would want to start out their work bench with. I came up with a small list of items that will come in handy when stocking your work bench. I'm sure others will add on to it as well.
1) Sanding sticks: (flex-i-file has line of them, or you can hit the beauty supply isle at your local Walmart or Dollar store for similar items used for nails.) They usually have 4 grits per stick and are really nice to have around.
2) Wood Clothes Pins: These things are cheap and are great for holding parts together while glue dries, or for holding them while paint dries. Add a thin layer of rubber cement to the clamping surface, let dry, and they won't slide off of rounded or angled surfaces so easy.
3) Exacto Knife and plenty of new #11 blades. Buy them by the hundreds.. a good sharp blade is much easier and as weird as this sounds.. much safer to work with.
4) Razor Saw: Exacto makes a nice one with changeable saw blades. Great for cutting through plastic quick and easy.
5) Testors Plastic Cement Liquid: Works great when applied with a fine hair brush and has other uses. *See previous TIP in this thread regarding "Liquid Plastic".
6) An assortment of brushes: You can find a nice assortment at Walmart in the arts and crafts section. A nice supply of natural and synthetic hair brushes is always a must.
7) Strip, Sheet, and tube styrene: You can find a nice assortment pack of EVERYGREEN brand styrene at any well stocked hobby store or even check Ebay if you don't have a store near you. This stuff is great to have for filling gaps, custom work, and scratch building complete assemblies.
8) Jeweler's files: These little things are nice to have around when working with delicate photoetch pieces. Pick up a cheap little wire brush too to clean them when they get clogged.
9)Sand Paper: Always good to have around in assorted grits. Automotive sand paper works great.
10) Filler Putty: Squadron brand "Green" stuff works great with less shrinkage. Find it at any well stocked hobby store or EBay.
11) Super glue: Its great to have when quick set up is needed or when working with Resin and Photoetch pieces and kits. I prefer to use the "LOCTITE" brand found at Walmart and other retail locations.
12) Emery boards: (Yep that's right!) They're not just for your wife's nails. Pick up a large assortment pack at your local Dollar store cheap. These work great, are disposable, and can be cut if needed to fit in tight places.
13) Measuring cups: The little left over medicine cups from Nyquil, Pepo, and other over the counter liquids are handy for mixing paints or even just pour a small quantity of paint into one and use the paint from there so your jar of paint doesn't dry out too early. You can also purchase mixing cups at your local hobby shop or EBay.
14) Tweezers: These are great for holding small and delicate parts during painting or gluing. You can pick them up cheap at dollar stores, garage sales, and flea markets. Also pick up a quality pair of locking or spring loaded tweezers. They are great to have around... Oh and be sure you DON'T use your wife's unless you want to sleep on the couch.
Of course as you progress you will want to pick up an airbrush and a good quality compressor. Painting models, especially Macross and Robotech kits, can look ok using brushes or can paints.. but if you really want them to POP an airbrush paint job is a nice way to do it. Can paints work ok but you can easily lose the delicate panel lines and details if too much is used. Airbrushing allows you to give them a nice "scale" paint job. Finding a good quality compressor is a must. Sure you can get by with a cheapy, but a good quality compressor will offer years of trouble free service and great results... so if you want to spend the extra money... this is where you'd want to spend it.
Well I hope you found something here that you can use to augment your work bench. Feel free to add any other items to the list.
Thank you again for your time and Happy Modeling.
Mark
Find Mark Warlock now on Facebook.
Please Log in to join the conversation.
- blackconvoy_D01
-
- Offline
- Veritech Fighter
-
- Posts: 289
- Thank you received: 0
Replied by blackconvoy_D01 on topic Re:ROBOTECH: Modelers Resource Center
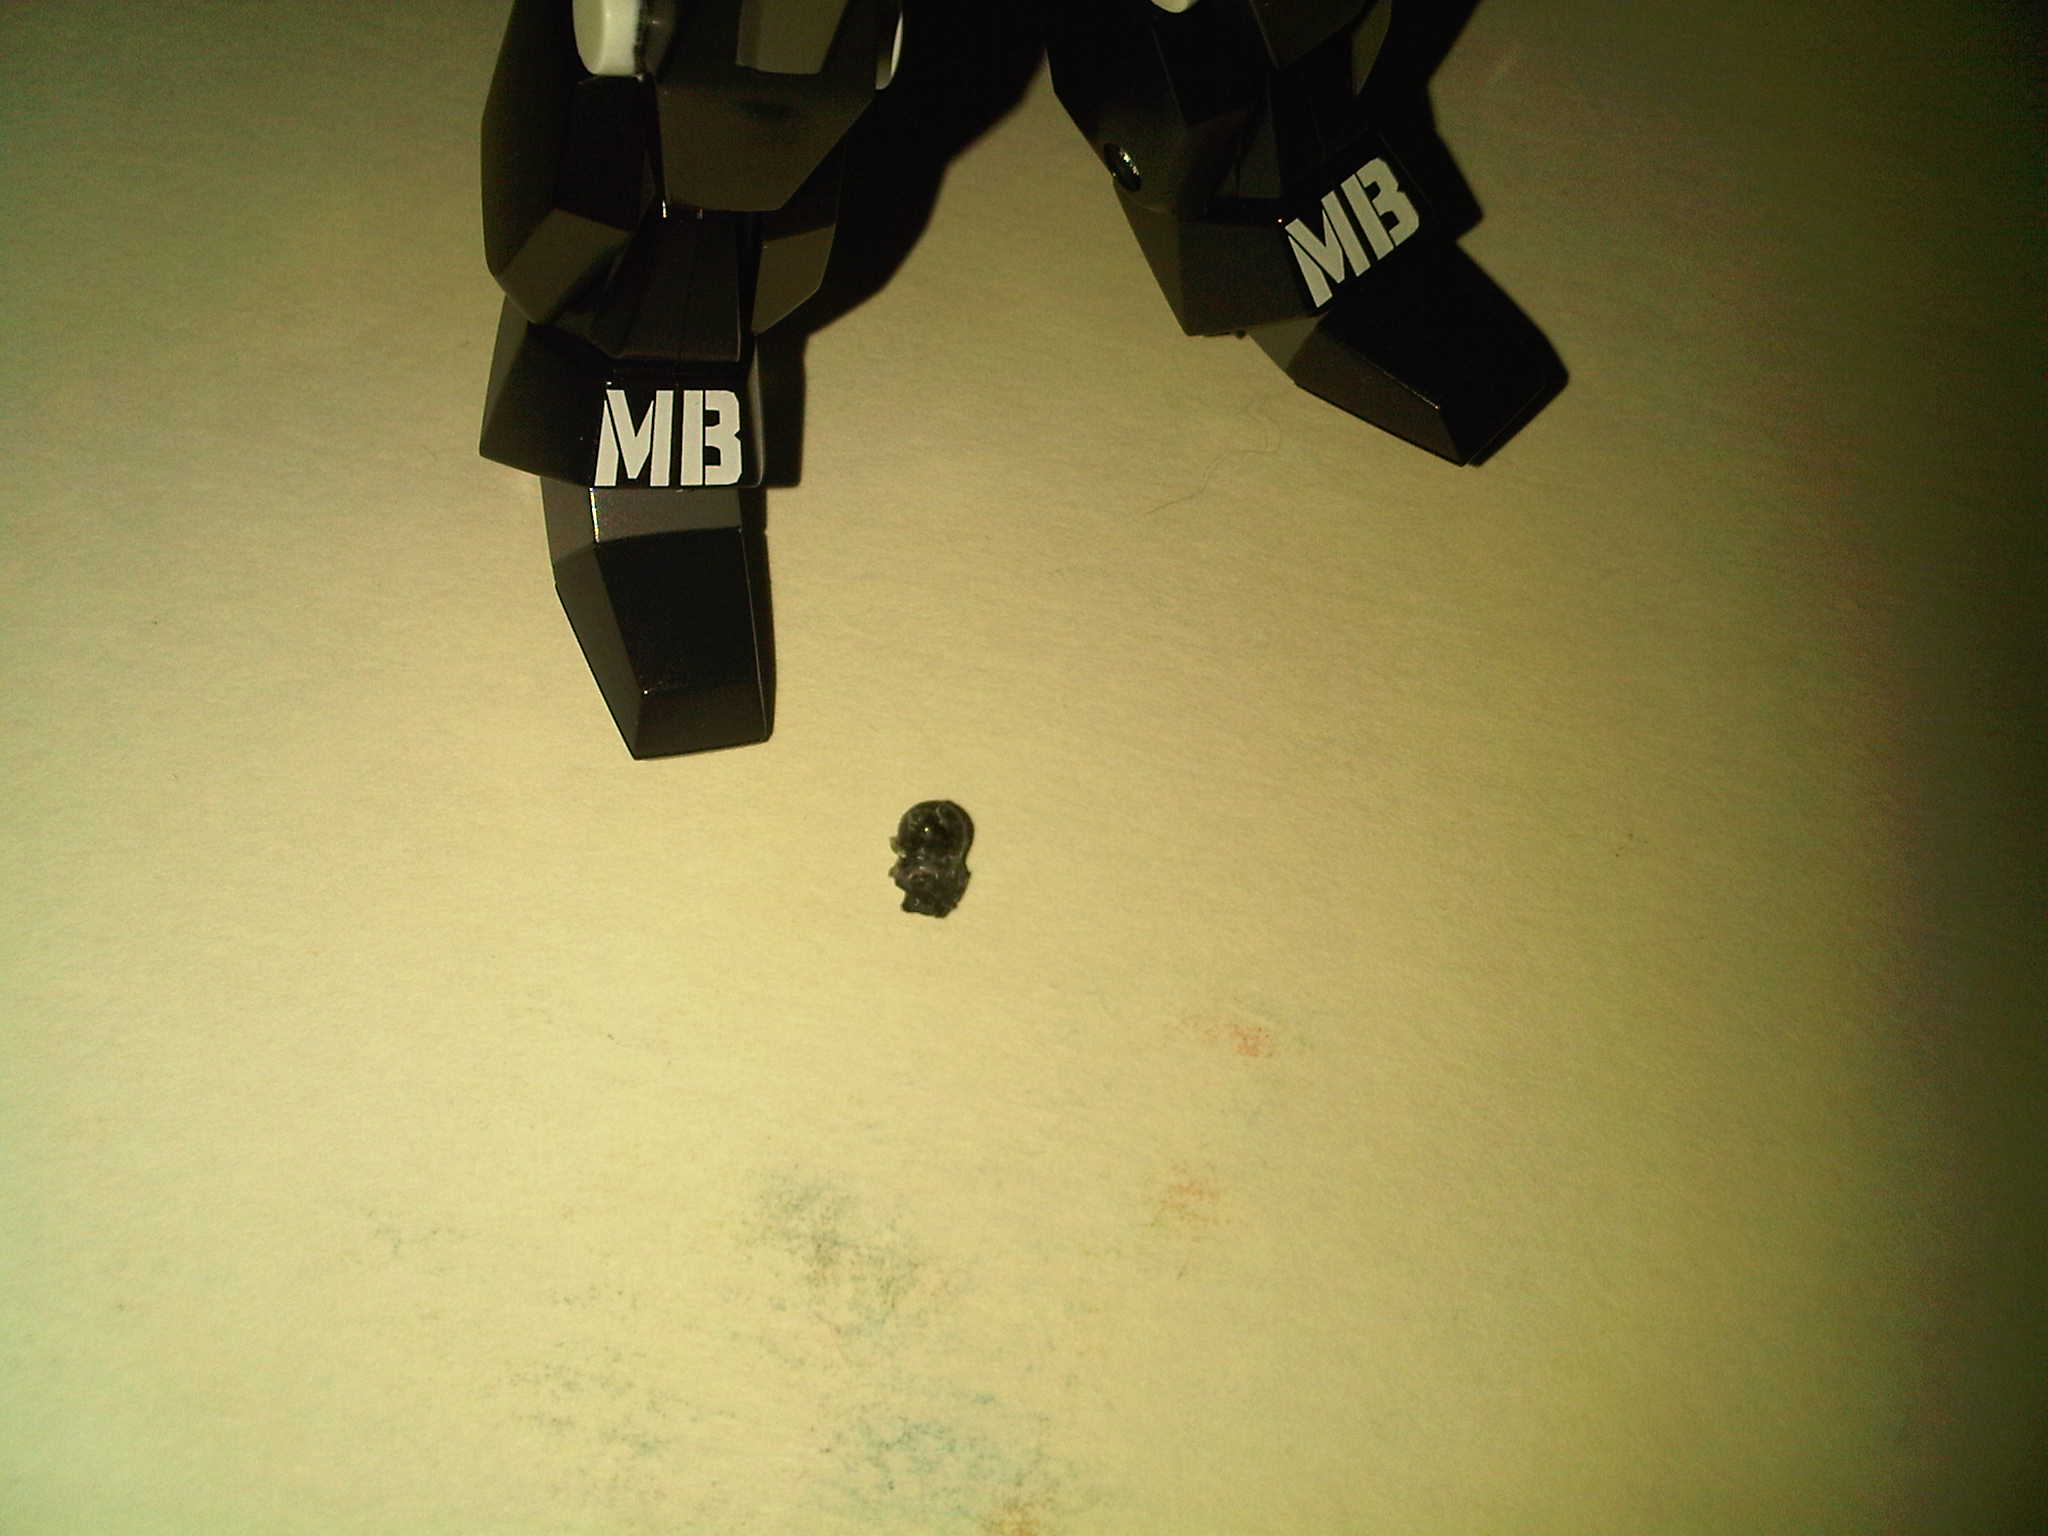
So I got my Dark Stick a week ago. I noticed that the toy was loose in certain areas so I removed the torso from the waist and applied a solution to give the ball at the waist of the Dark Stick into the socket a tighter and firmer grip. A few days passed and I noticed there was still looseness at this area of the figure. I repeated my process but this time I applied too much force causing the ball at the waist to break off. Naturally I dismantiled the toy from the wasit down. I took the broken ball peg and sanded it a bit, applied glue to the area where the peg had broken off of. I also reglued the entire waist area assuming that my 2 hrs of work would be an end all to the problem. I let the area sit over night for the glue to take to the peg and would proceed to reconnect the toy. Using limited force I reattempted this morning and the ball peg came off again. And now I am unable to reopen the waist area to reattempt any form of work from within the toy. Ive thought of looking at hobby shops for a small plastic base with peg and ball to possibly glue to the toy now but I know that finding such a thing in my area would be a long shot. I've attached pics of my crime. Can you help? Thank you. Thomas
www.flickr.com/photos/26350372@N04/
Please Log in to join the conversation.
- Mark-Warlock
-
Topic Author
- Offline
- Veritech Fighter
-
- Writer
- Posts: 301
- Thank you received: 0
Replied by Mark-Warlock on topic Re:ROBOTECH: Modelers Resource Center
Got another one for you Mark...
So I got my Dark Stick a week ago. I noticed that the toy was loose in certain areas so I removed the torso from the waist and applied a solution to give the ball at the waist of the Dark Stick into the socket a tighter and firmer grip. A few days passed and I noticed there was still looseness at this area of the figure. I repeated my process but this time I applied too much force causing the ball at the waist to break off. Naturally I dismantiled the toy from the wasit down. I took the broken ball peg and sanded it a bit, applied glue to the area where the peg had broken off of. I also reglued the entire waist area assuming that my 2 hrs of work would be an end all to the problem. I let the area sit over night for the glue to take to the peg and would proceed to reconnect the toy. Using limited force I reattempted this morning and the ball peg came off again. And now I am unable to reopen the waist area to reattempt any form of work from within the toy. Ive thought of looking at hobby shops for a small plastic base with peg and ball to possibly glue to the toy now but I know that finding such a thing in my area would be a long shot. I've attached pics of my crime. Can you help? Thank you. Thomas
UGH... that kind of stuff makes you sick to your stomach when it happens huh... You spend your hard earned money and time waiting for it to come in then SNAP... something breaks..
Well I've dealt with a few broken pegs in my day... and unfortunately sometimes there's nothing that can be done... However.. Here’s a tip that may help you with a repair.
First you'll need a small drill bit and pen vise that can be purchased either online or at any well stocked hobby shop. Be sure and select a good size that won't be too big or too small.
Next you'll want to scrape off as much of the old glue from the area as possible but be sure you don't change any of the characteristics of the break area. You'll want to make sure that the two pieces are going to mate back together perfectly.
Now that the area is cleaned up line the parts up and get a good idea on how they fit together. Once you have a good idea of the fit you'll want to find the center of both the broken peg and its mating surface. You'll need a keen eye for this part... use a magnifying glass if need be.
Now start with the peg and drill a small hole into the broken area. Drill it as straight as possible and roughly about midway through the piece. Be sure to take your time and be patient. You don't want to fracture the piece. Once you've gotten that done you'll want to find a small piece of wire. If at all possible the best thing to use is a paper clip. Cut a small piece of paper clip and insert it into the hole you just drilled. For this step you want the paper clip to be just long enough to bottom out in the hole and only extend out of the hole enough to grab with tweezers or pliers to pull it out.
Now, take you some red paint and put a dab at the tip of the paper clip that sticking out of the peg. Now line up the peg with its mating surface and put the two together. They won't seat all the way and that's ok... We're not trying to do that here.. What we are trying to do is to locate the center of the broken area. Take them apart and some of the red paint should have transferred to the other part. If you've done your work right this will be the center for your next hole.
Now that you have your center.. drill another hole into that part. You’ll want the hole to be as deep as the one on the peg.. doesn't have to be deeper.
Once you have both drilled select a new piece of paper clip and cut it to fit. Once it's all ready take some denatured alcohol and clean the surfaces of any dust or contaminates. Now use either a good Super Glue (I prefer LOCTITE brand) or a good 2 part epoxy glue and put some on one end of the paperclip and insert it into the peg. Allow that to set. Once that has set put some on the other end of the paper clip and a little around the mating surfaces. A little goes a long way so don't put too much. Once you mate the peg in place use your finger or a flattened tooth pick to smooth any excess glue across the break area. Now put it aside and let it set up.
The paper clip helps reinforce the repair and gives it more stability.
Hope this helps you out.
Let me know how it goes.
Mark
Find Mark Warlock now on Facebook.
Please Log in to join the conversation.
- blackconvoy_D01
-
- Offline
- Veritech Fighter
-
- Posts: 289
- Thank you received: 0
Replied by blackconvoy_D01 on topic Re:ROBOTECH: Modelers Resource Center
www.flickr.com/photos/26350372@N04/
Please Log in to join the conversation.
- Mark-Warlock
-
Topic Author
- Offline
- Veritech Fighter
-
- Writer
- Posts: 301
- Thank you received: 0
Replied by Mark-Warlock on topic Re:ROBOTECH: Modelers Resource Center
Its a mess I know. Thank you for the guide to fix. Ill start it tonight and post my progress.
It happens to all of us at some point... Good luck with the surgery...
Find Mark Warlock now on Facebook.
Please Log in to join the conversation.
- blackconvoy_D01
-
- Offline
- Veritech Fighter
-
- Posts: 289
- Thank you received: 0
Replied by blackconvoy_D01 on topic Re:ROBOTECH: Modelers Resource Center
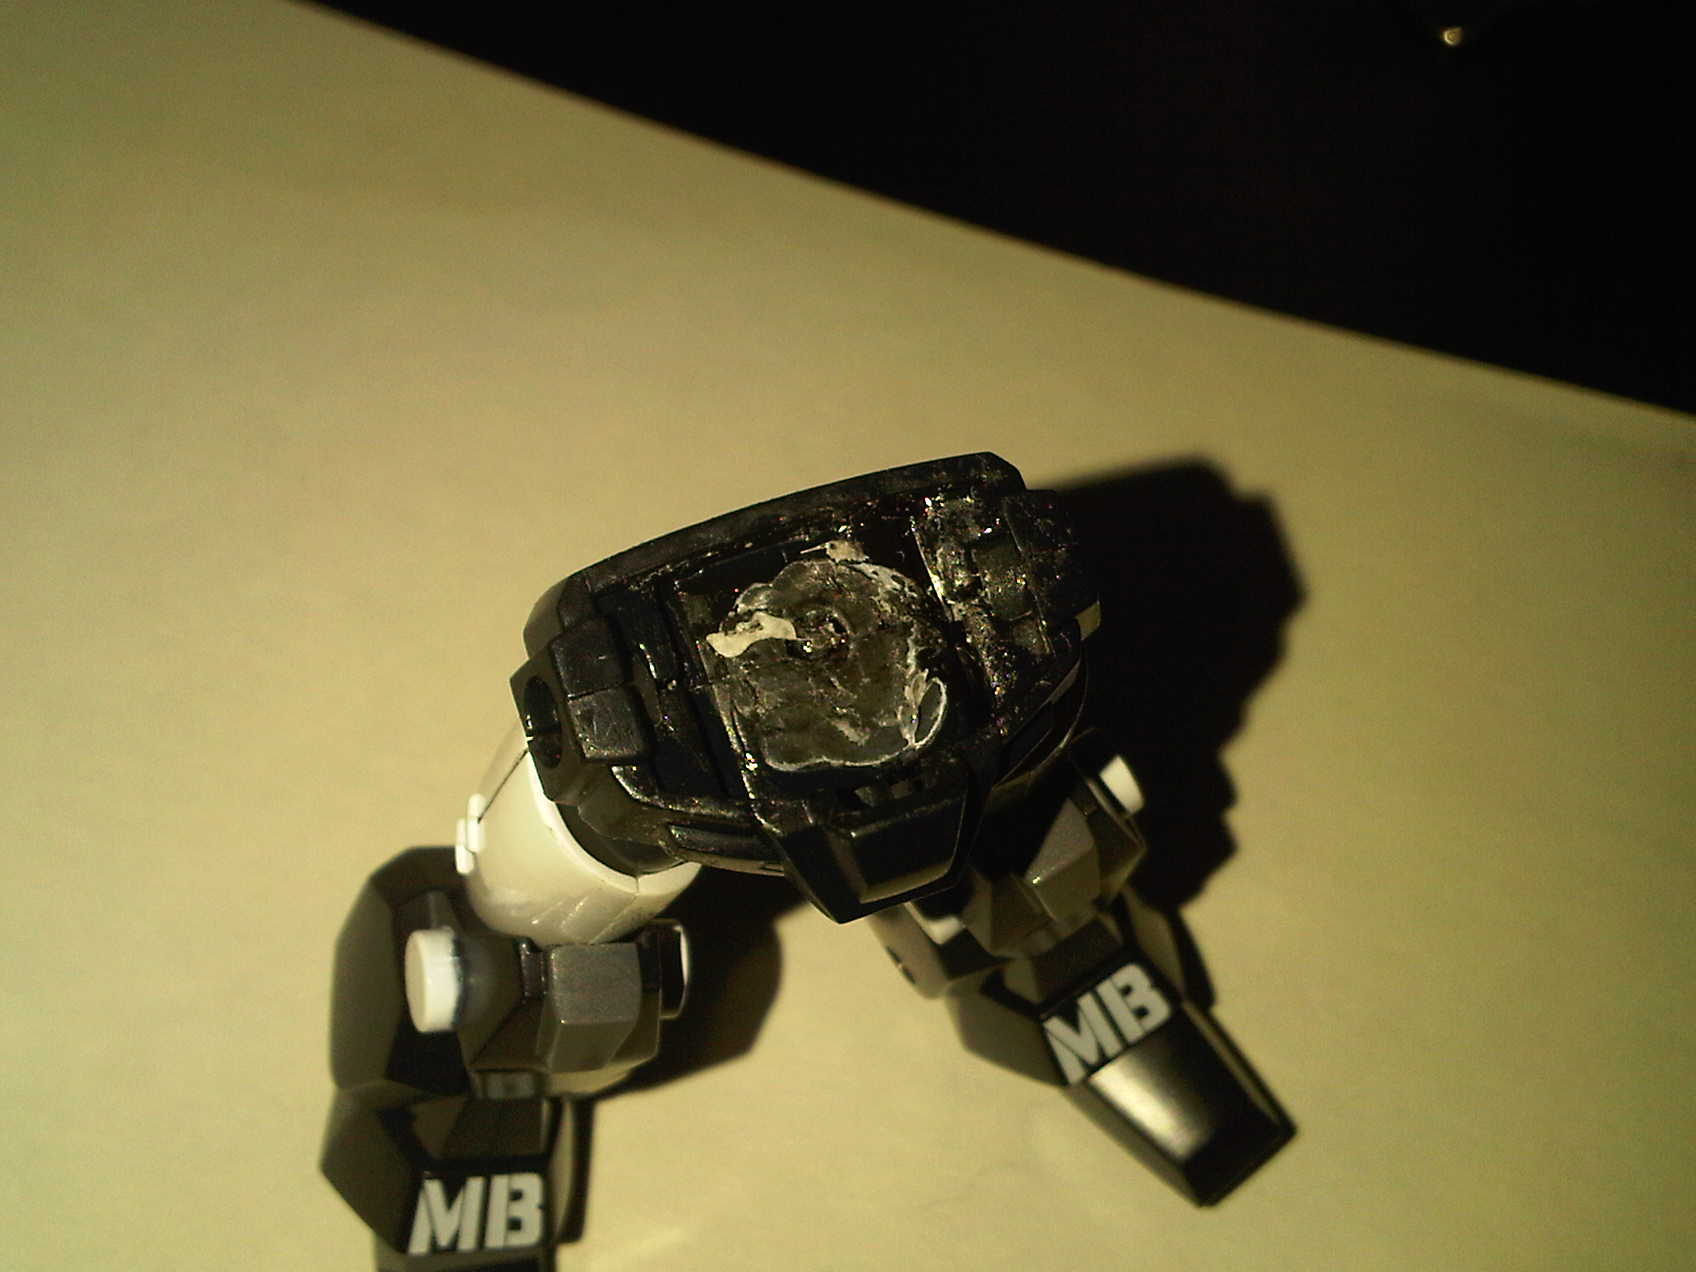
I couldnt figure out the paperclip after about 4 hrs of attempting, re-reading , and the Yankees losing, all after work tonight. I got really desperate and since my toy funds are depeleted until about after aug. I dumped it. I stood over the trash with the complete intact rode armor cycle and the two halves of Dark Stick and the plastic tray it came in and box. I noticed that the hands had a base of a stick and a ball. I wnet back into surgery. Slicing off the ball and peg end of one of the fist(incase you dont know, the megahouse ride armors come with 3 pairs of hands)with just enough of the base to support the peg out of the hole(which you advised me to drill to form a bit larger- BRILLIANT). I sealed the waist area back up and voila. Stick is whole again. Dude you are a wealth of knowledge. This is the second time you've helped me out in a big toy jam.
Thanks!
Thomas
www.flickr.com/photos/26350372@N04/
Please Log in to join the conversation.
- Mark-Warlock
-
Topic Author
- Offline
- Veritech Fighter
-
- Writer
- Posts: 301
- Thank you received: 0
Replied by Mark-Warlock on topic Re:ROBOTECH: Modelers Resource Center
Hi Mark,
I couldnt figure out the paperclip after about 4 hrs of attempting, re-reading , and the Yankees losing, all after work tonight. I got really desperate and since my toy funds are depeleted until about after aug. I dumped it. I stood over the trash with the complete intact rode armor cycle and the two halves of Dark Stick and the plastic tray it came in and box. I noticed that the hands had a base of a stick and a ball. I wnet back into surgery. Slicing off the ball and peg end of one of the fist(incase you dont know, the megahouse ride armors come with 3 pairs of hands)with just enough of the base to support the peg out of the hole(which you advised me to drill to form a bit larger- BRILLIANT). I sealed the waist area back up and voila. Stick is whole again. Dude you are a wealth of knowledge. This is the second time you've helped me out in a big toy jam.
Thanks!
Thomas
Blackconvoy
Glad you could use some of the information. You know I grew up working on all kinds of models and at times I look at how toys are made and well... To an extent they are a type of model. Like I've said before... always think outside the box.
I'm glad I could help.
Mark
Find Mark Warlock now on Facebook.
Please Log in to join the conversation.